Objects
PixelMonitor objects are special datasets (they are responsible for storing information necessary for drawing an object on the map, and may contain other useful properties), to which other objects can be added, such as devices, datasets, and media objects.
The purpose of PixelMonitor objects is to visualize the position and state of real objects that are equipped with one or more devices. Objects can move around the map and change their appearance: inside the object, you can configure events in which it will change the icon and color, as well as signal the presence of a problem (critical event).
The number of objects that are part of the PixelMonitor object is not limited, in addition, an object that is part of the object can also be part of other groups of objects. This ensures the flexibility of the system and the ability to provide the same real structures with different degrees of detail.
Viewing objects
Objects in PixelMonitor are displayed in the list when Objects or Object groups are selected in the menu, and on the map.
On the map, objects are displayed as colored circles with icons (except for the point mode, which can be enabled in the settings). The color of the circle corresponds to the color of the object, and the icon corresponds to the current state of the object. Objects that are too close on the screen are collected in clusters, which display the number of objects that are included in them and the conditional ratio of the number of objects of different colors that are included in the cluster. To view all the objects separately, you need to zoom in on the map.
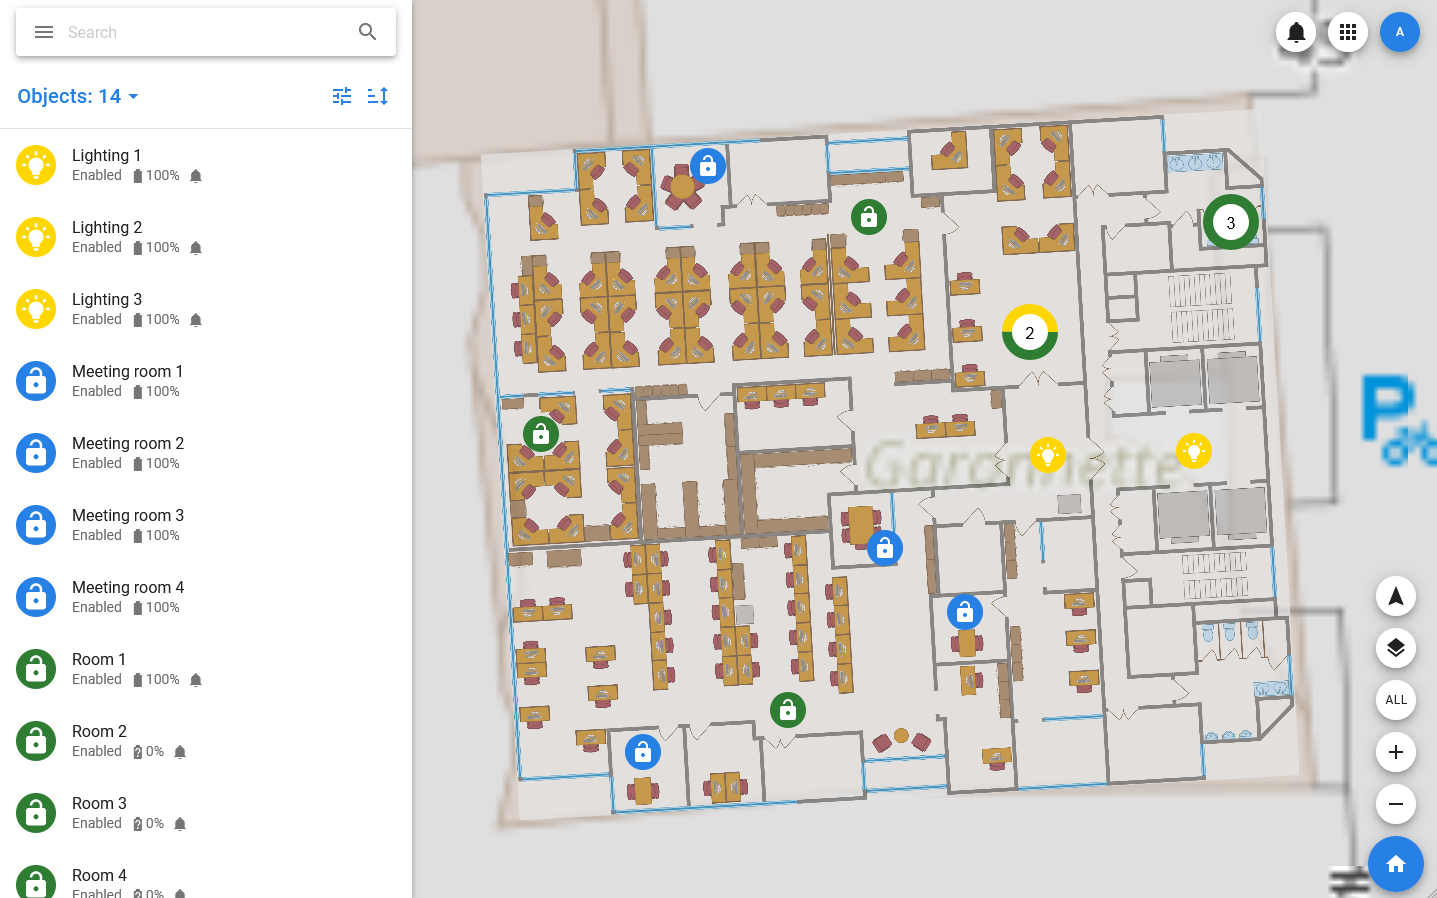
When you hover the mouse pointer over an object on the map, a card opens, which displays a picture of the object, its name and a set of statuses. When you click on an object, it switches to selection mode and opens its main card, which overlaps the list on the left side of the screen.
If a list item is selected, the card also opens, and the object on the map switches to selection mode. The map is shifted so that the selected object is in the center of the screen.
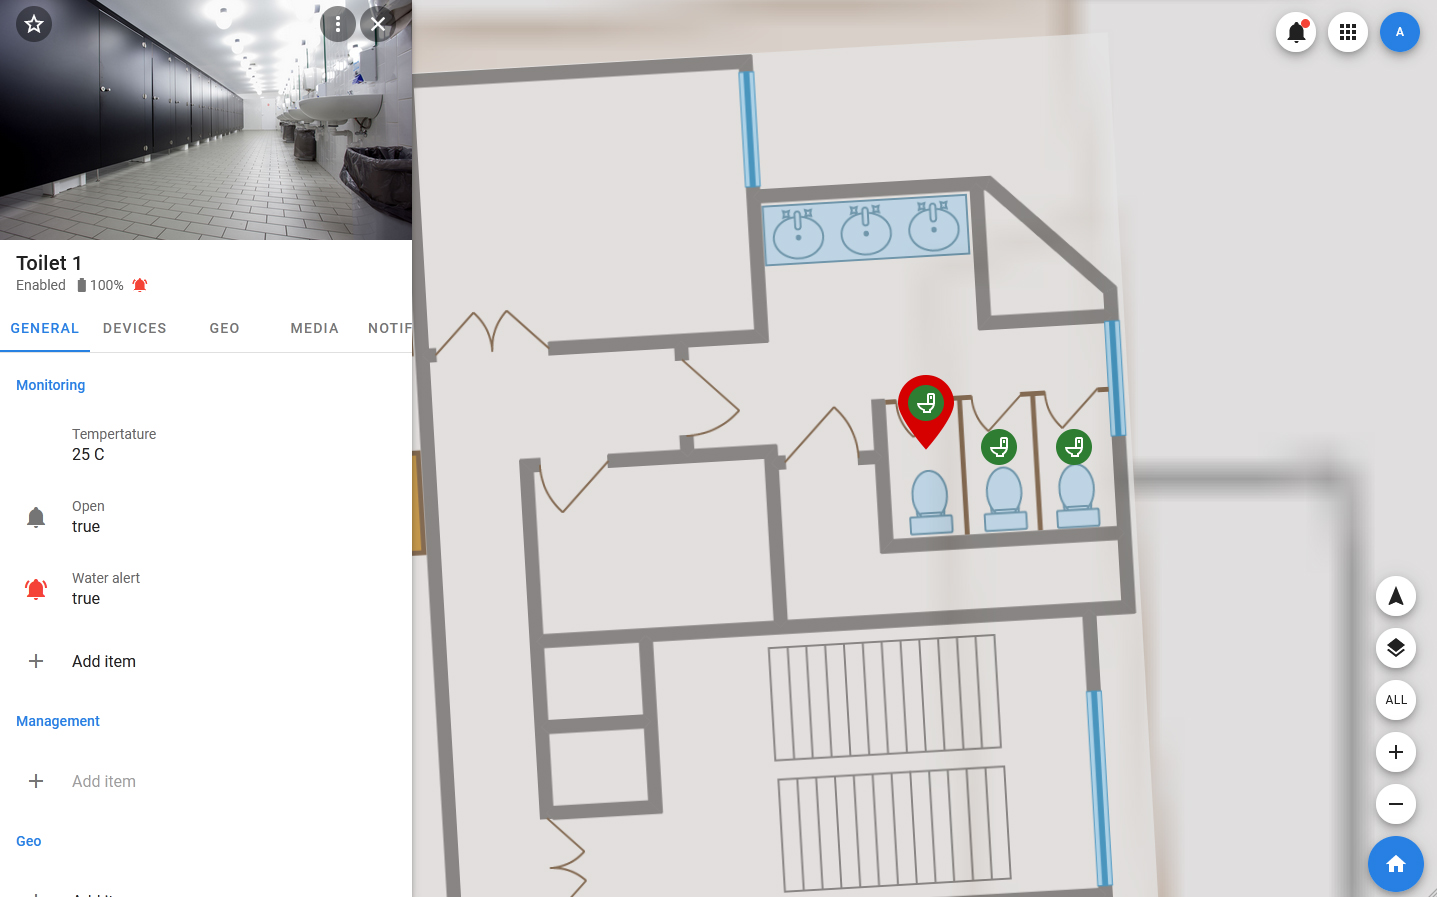
The object card displays all available information about it. In the header of the object, its image, avatar (consisting of a colored circle and an icon of the object's status), the name of the object and a set of statuses are displayed. Critical statuses are highlighted in red.
In the card toolbar, there is a close button, a favorites control button (if the object is added to favorites, it looks like a filled star, if not — like a contour) and a button to open the context menu.
The card includes the following tabs:
- GENERAL — basic information about the object and fields for which you can manage and create alarms (events for which notifications should be issued). This tab also displays information about the current object coordinate and object groups, a description, and a unique UUID.
- DEVICES — a tab that displays a list of devices added to the object. When you select a device in the list, its card will open, containing information about its properties.
- DATASETS — a tab that displays a list of datatests added to the object. When you select a dataset in the list, its card will open, containing information about its properties.
- MEDIA — a tab that displays media files added to the object. When you select a separate media file, it opens in a pop-up window.
- GEO — a tab that displays a list of landmarks and geozones, with the position of which the current position of the object is compared. The landmarks and geozones from this list can be used as sources for Monitoring items.
- NOTIFICATIONS — this tab displays all notifications related to this object (sent by both the system and users).
- ACCESS — a tab that displays information about access rights to the object.
Object management
Creating objects
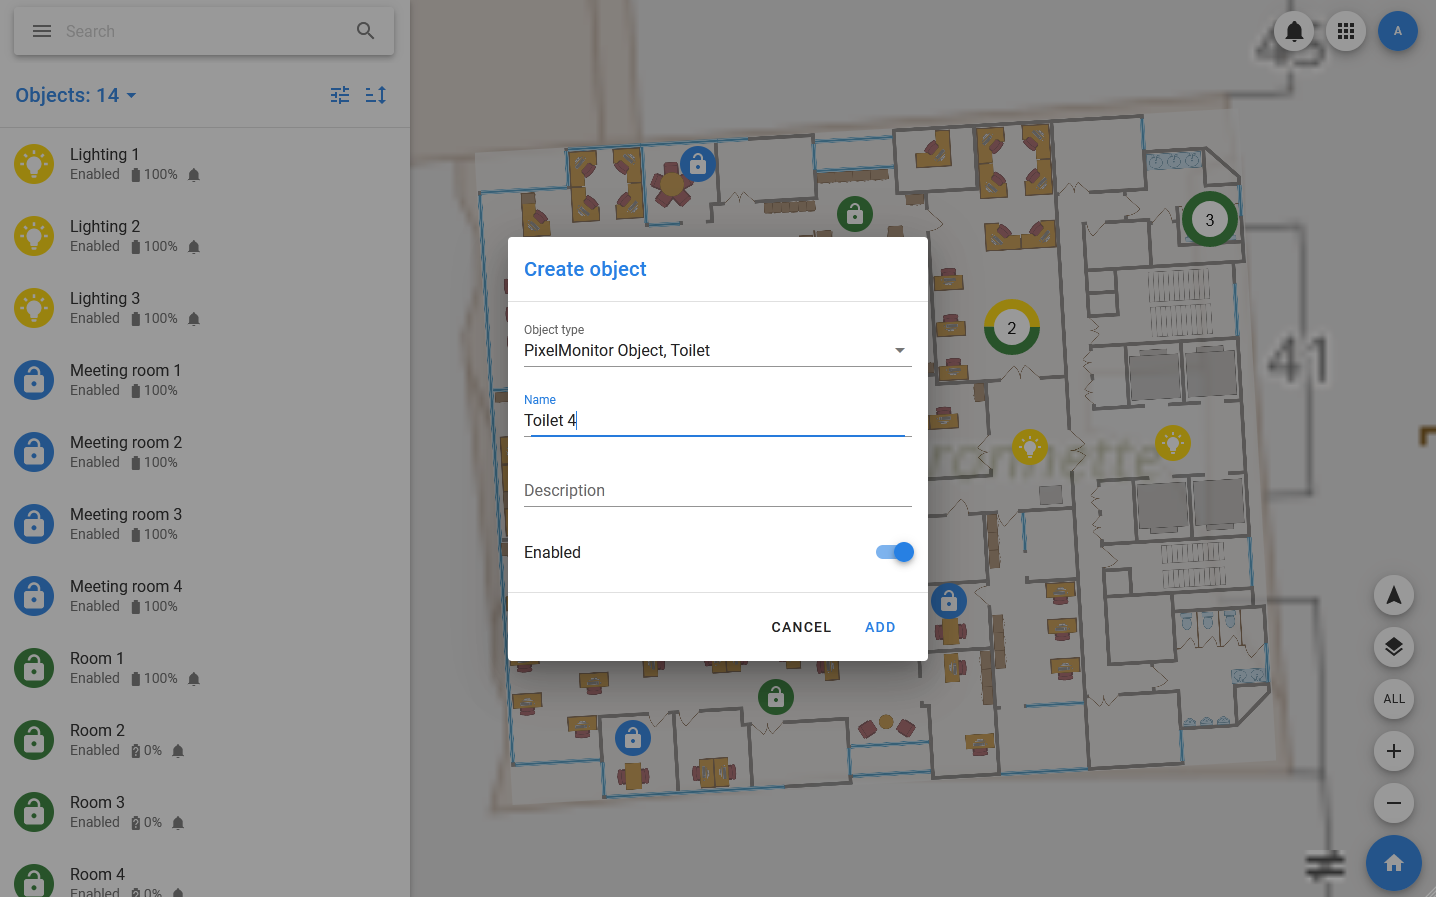
A new Pixel Monitor object can be created in the general list (All objects) or within a group — in this case, the object will be immediately added to the group from which the creation dialog is called. The type and name must be selected for the object.
To create an object, you must:
- Select Objects from the menu or one of the object groups, if the object is to be created in it.
- In the object list toolbar, select Objects > Add new.
- In the window that opens, specify the type, object name, description, groups that the object should be included in, upload a photo to be used in the card.
- Click ADD: If the object is successfully created, its card will open, and the object itself will appear in the center of the map.
All further configuration of the object is carried out through its editing.
Creating from devices
If there are already devices in the system that need to be represented in the Pixel Monitor as objects, there is a special function for this to Create from devices.
The dialog for adding objects based on devices is called in the same way as the dialog for adding new objects. It is necessary to specify the data schema (driver) of devices and the type of objects in it, and you can also configure states, items, optional sources of coordinates of objects. If the devices have coordinates, then the Pixel Monitor will be able to position objects on the map in accordance with them. However, if there are no coordinates, all objects will be created at one point, and you will have to manually change their location.
To create objects from devices, you must:
- In the menu, select All objects or a group of objects to which they should be automatically added.
- In the object list toolbar, select Objects > Create from devices.
- On the main tab, you must specify the data schema (driver) of the devices.
- The Status and Name contains fields can be used to ensure that the Pixel Monitor does not use all existing devices with the selected driver, but only certain ones.
- In the Object info section, you must specify basic information about the objects to be created: their type, the basis of the name, the beginning of numbering, the main geotag, the list of groups in which the objects should be included.
- In the States tab, you can establish a relationship between the properties of the device and the states of the object. If you leave this section empty, the device will not affect the state of the object.
- In the Items tab, you can establish a relationship between the device properties and items (if they are in the selected type).
- In the Location tab, you can establish a relationship between the device properties and optional sets of object coordinates (if any).
- Click CREATE and wait for the operation to complete.
Editing an object
The following actions are available for the object, which are displayed in the ego context menu in the list and in the card:
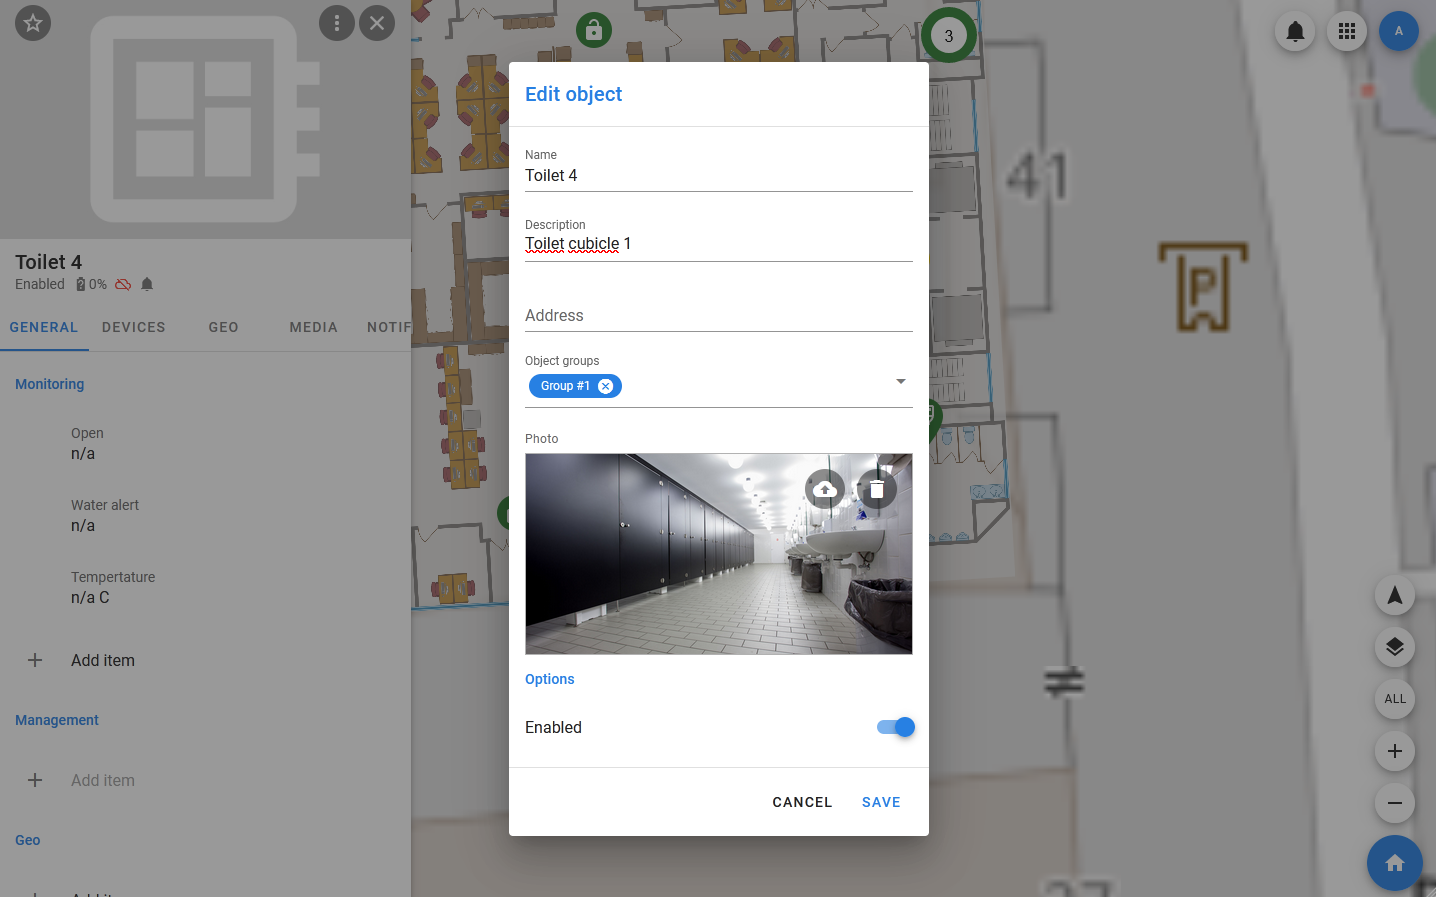
- Edit — correction of basic information about the object. It includes the name, description, photos, a list of object groups, and the value of the emulation flag. The object type cannot be changed.
- Change access — opens the dialog for changing access rights to the object.
- States and colors — settings for changing states and colors, as well as the default color. For each state that exists in the type, you can select a color, and also specify at which value of which property the transition to this state should be performed. A state that has a higher position in the list has a higher priority.
- Mute — disabling the notification from the object.
- Disable / Enable — sets the status value to enabled / disabled. If an object gets the Disabled status, then all objects that are part of the ego get the ego.
- Moving — correction of the object’s position on the map. This option allows you to move the object in visual mode.
- Set coordinates source — setting of the easterners of the optional coordinates. For each set of optional coordinates, you can select the object and ego properties around which they should be taken.
- Show history — shows the history of the monitoring object.
- Download notifications — displays the dialog for downloading notifications of the monitoring object.
- Copy UUID — copy the UUID of the object.
- Delete — delete the monitoring object. It does not delete the objects included in it (devices, datasets, media).
You can also configure and manage an object directly from its card, by interacting with its elements.
In the GENERAL tab, you can add, change, and delete the Monitoring items and Management items fields, which allow you to set conditions for critical events that issue notifications, as well as pass values to fields.
Monitoring items
The fields in this section can issue notifications if certain conditions are met. The list of fields themselves is defined inside the type: for all objects of the same type, the list of items will be the same.
The following actions are available for them:
- Edit — edit, allows you to change the source, object, and / or property.
- Show history — opens a window with the history of changing the field value.
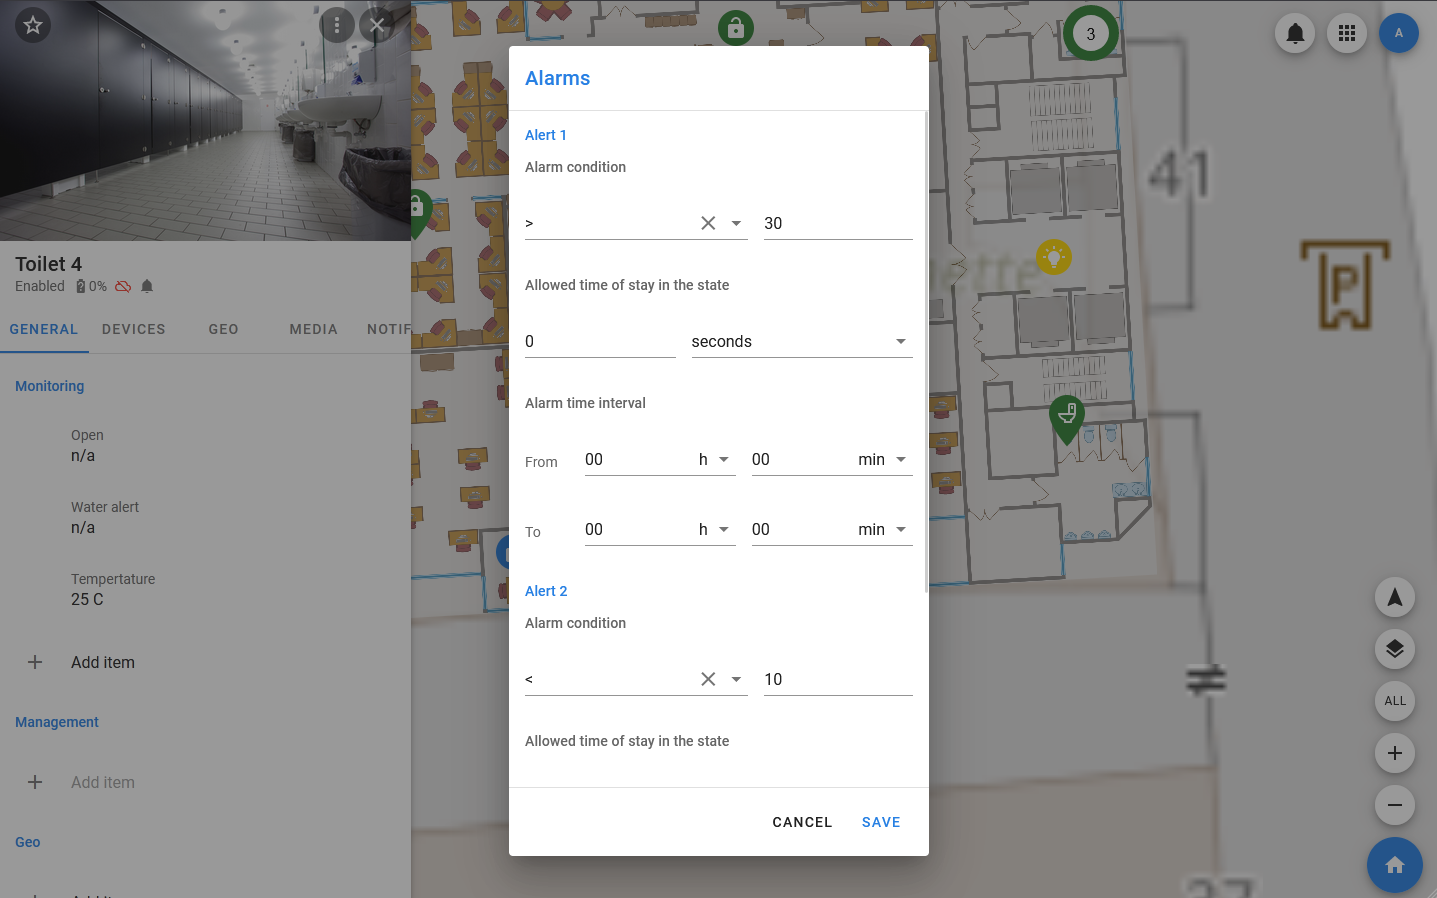
- Alarms — setting the conditions under which notifications (alarms) will be issued.
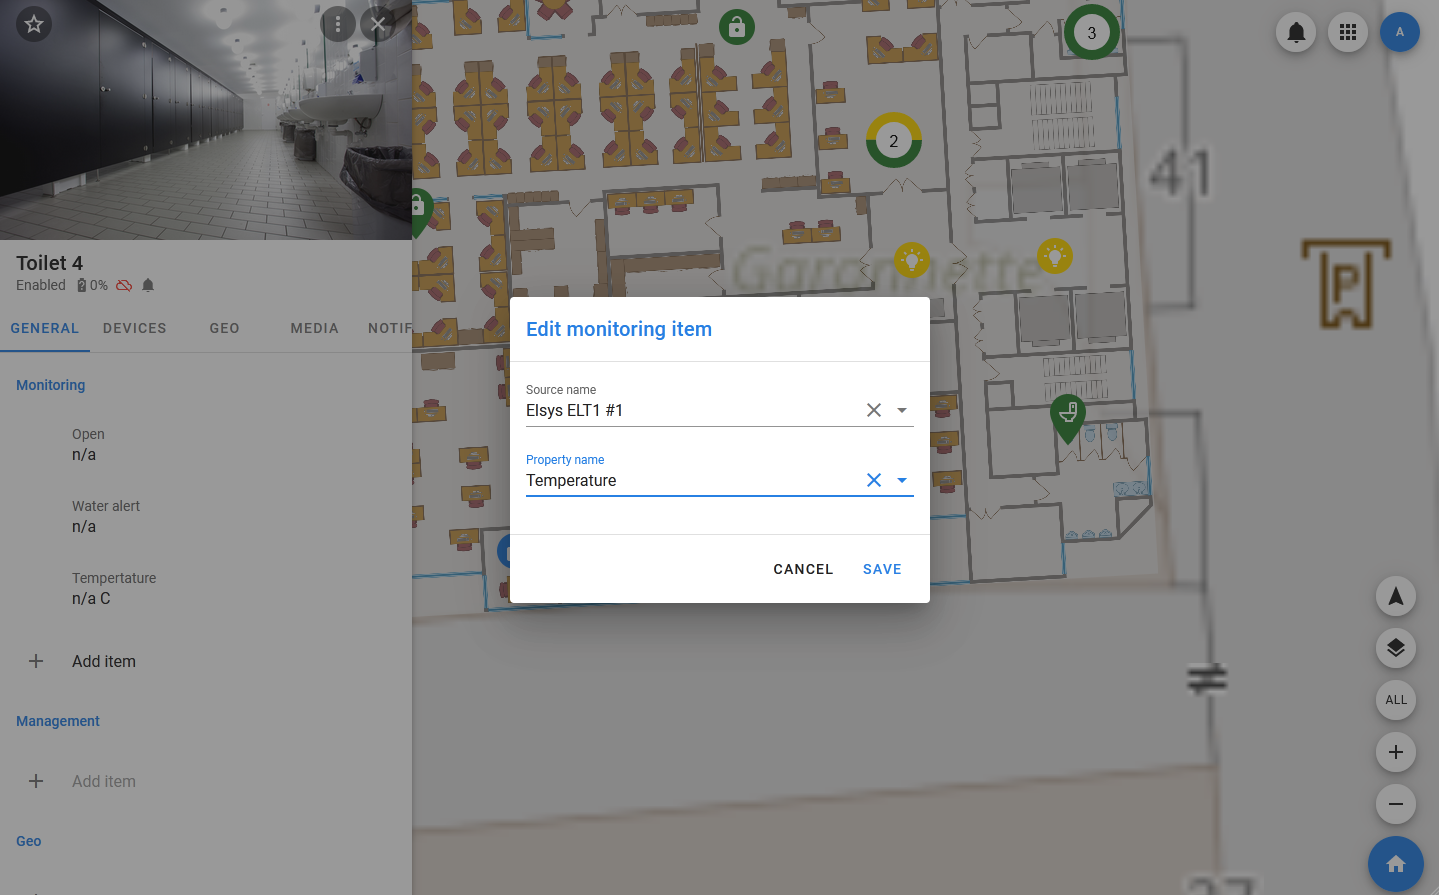
When setting the conditions for issuing notifications, specify:
- Alarm condition — the alarm condition. Specifies the condition with which the value that the property accepts should be compared.
- Allowed time of stay in the state — the time during which the condition must be met for the alarm to be triggered. The default value is zero.
- Alarm time interval — the time interval during which the alarm condition should be checked (used to set day and night alarms or alarms related to the operating time).
Management items
The fields in this section are intended for controlling the object (sending control commands to it).
The list of these fields is also defined within the type. Unlike monitoring items, management items are designed to work not with properties, but with controls. Alarm conditions cannot be configured for them, you can send commands for execution.
The following actions are available for them:
- Edit — edit, allows you to change the source, object, and / or property.
- Show history — opens a window with the history of changing the field value.
- Set value — sets the value of the property.
- Delete — delete. After the monitoring item is removed, it can be added again with a different source.
Geo items
The fields in this section are not linked to individual properties of other objects (devices or datasets), but to geo-groups, and are used to calculate the position of the object relative to them and issue appropriate alarms.
Changes in the structure of the object
If you have the appropriate rights, the user can change the structure of the object, namely, add and delete objects. If an object is created without using a template, then at the very beginning it does not contain any objects, except for the PixelMonitor object and the automatically created media object that stores the main photo (if it is uploaded).
Management of objects that are part of the object is carried out through the corresponding tabs of the object card. Each tab displays a list of objects of the corresponding type, which ends with the + Add positions used to add new elements. In the case of devices and datasets, both a new and an existing object can be added to the object. There are no restrictions on the number of objects that include the same object.
Linked objects
Any other system objects, primarily devices and datasets, can be linked to the Pixel Monitor object. You can use this if several devices monitor the state of an object from the real world: although the changes will have different sources, in a Pixel Monitor you will be able to represent them so that they relate to the same object
You can also use this mechanism to create collections of objects and objects that are complex in configuration, for example, to get statistics. The link mechanism is flexible and does not impose any restrictions. You can bind the same object to multiple Pixel Monitor objects and unlink it at any time.
Devices are objects, that is, instances of driver data schemas that are mapped to specific real or virtual devices, and are essentially representations of these devices in the party and the applications that work with it.
When linking devices to an object, their statuses begin to affect the status of the Pixel Monitor object, which is displayed in the list and in the header of the card. At the same time, if there are several devices, then the status of the object is determined based on the worst status of the devices. For example, regardless of how many devices will be linked to the object, if one of them has the Low Battery status, then the entire object will have the Low Battery status.
Datasets are objects that store application data (or user data, since their fields can be filled in either automatically or manually). They have a more flexible structure than devices, but they have the same set of standard actions.
You can get more detailed information about Pixel objects in the sections Pixel Admin > Devices and Pixel Admin > Datasets.
The list of all objects linked to the Pixel Monitor object is displayed in the Objects tab. You can add a new or existing object to it, link an object, delete it, or change its parameters. When you select an object in the list, its card opens, in which you can view detailed information about it.
To add a new linked object, you need to:
- Open the object card and select the OBJECTS tab.
- At the bottom of the list, select Add new.
- In the dialog box that opens, select the type of scheme (device, dataset, etc.), scheme, name and status of the new object.
- Click ADD.
After the object is created, it will appear in the list. You can open his card and customize it.
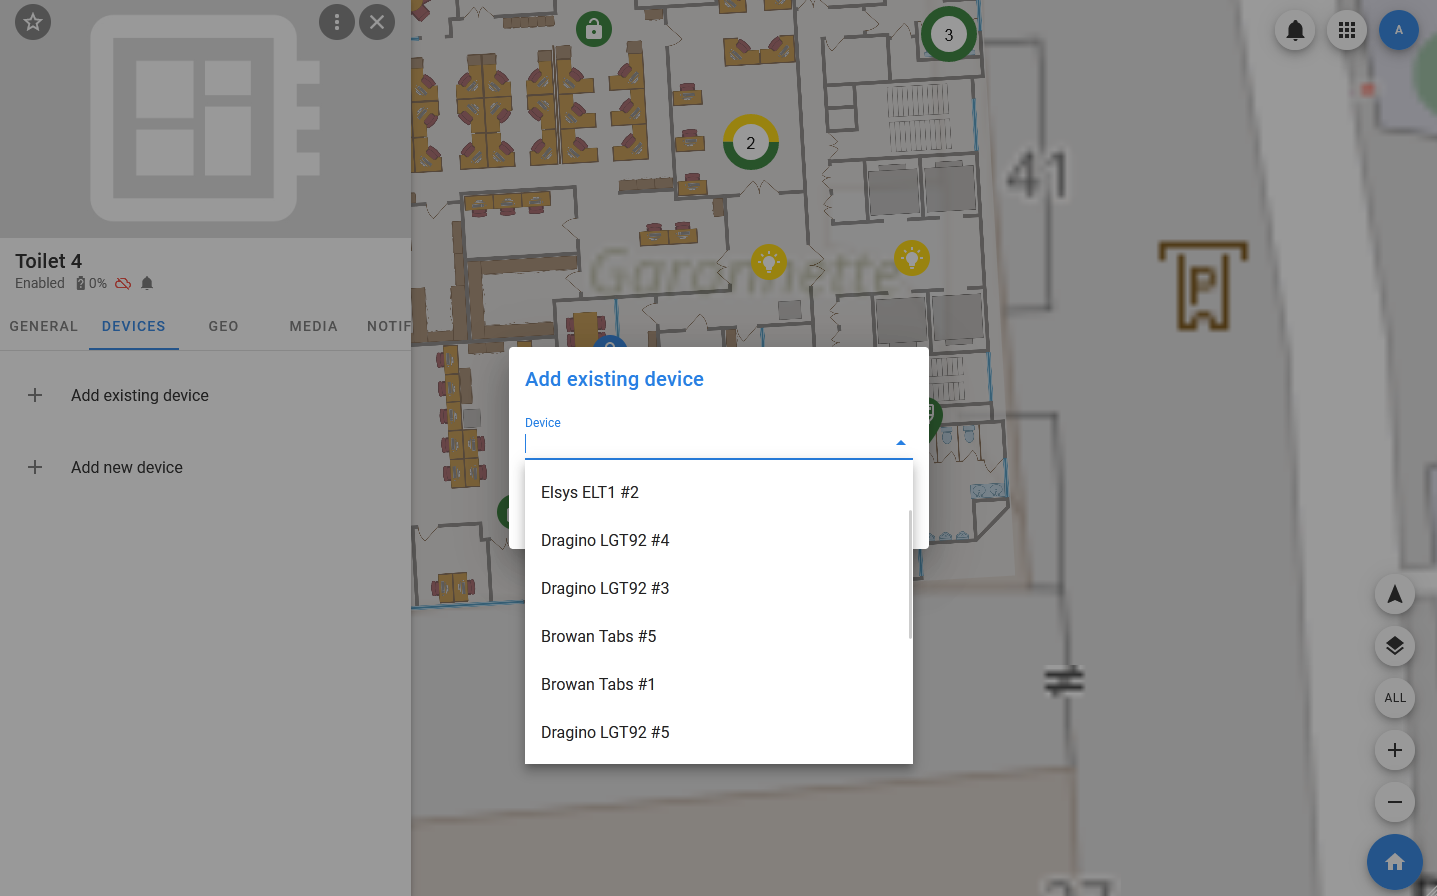
To add an existing object, you must:
- Open the object card and select the OBJECTS tab.
- At the bottom of the list, select Add existing.
- In the window that opens, specify the name or UUID of the object.
- Click ADD.
Media
Media objects are responsible for storing and processing media files in Thingularity. In the object, they are displayed in the MEDIA tab, where they are displayed in a list of cards, each of which contains an image, a title, a subtitle with a status, and a button to open the context menu. Similar to devices and datasets, you can add a new or existing media object to an object.
To add a new media object, you must:
- In the object card, select the MEDIA tab and select + Add new media at the bottom of the list.
- In the window that opens, enter the name of the media object.
- In the preview window, click on the download button (cloud with an arrow) — after that, the standard file system dialog should open, offering to select a file. The selected file should appear in the preview window. If necessary, it can be replaced with another one.
- Select the value of the Set enabled flag. If the switch is turned off, the created object will get the status Disabled, that is, it will neither receive nor transmit data.
- Click ADD.
After that, a card with the downloaded media file should appear in the list.
To add an existing media object, you must:
- Select the MEDIA tab in the object and select + Add new media at the bottom of the list.
- In the window that opens, specify the name and / or UUID of the media object.
- Click ADD.
After that, if such a media object exists, its card will be added to the list.