Devices
Devices are objects, that is, instances of driver data schemas that are mapped to specific real or virtual devices, and are essentially representations of these devices in the party and applications that work with it.
Viewing devices
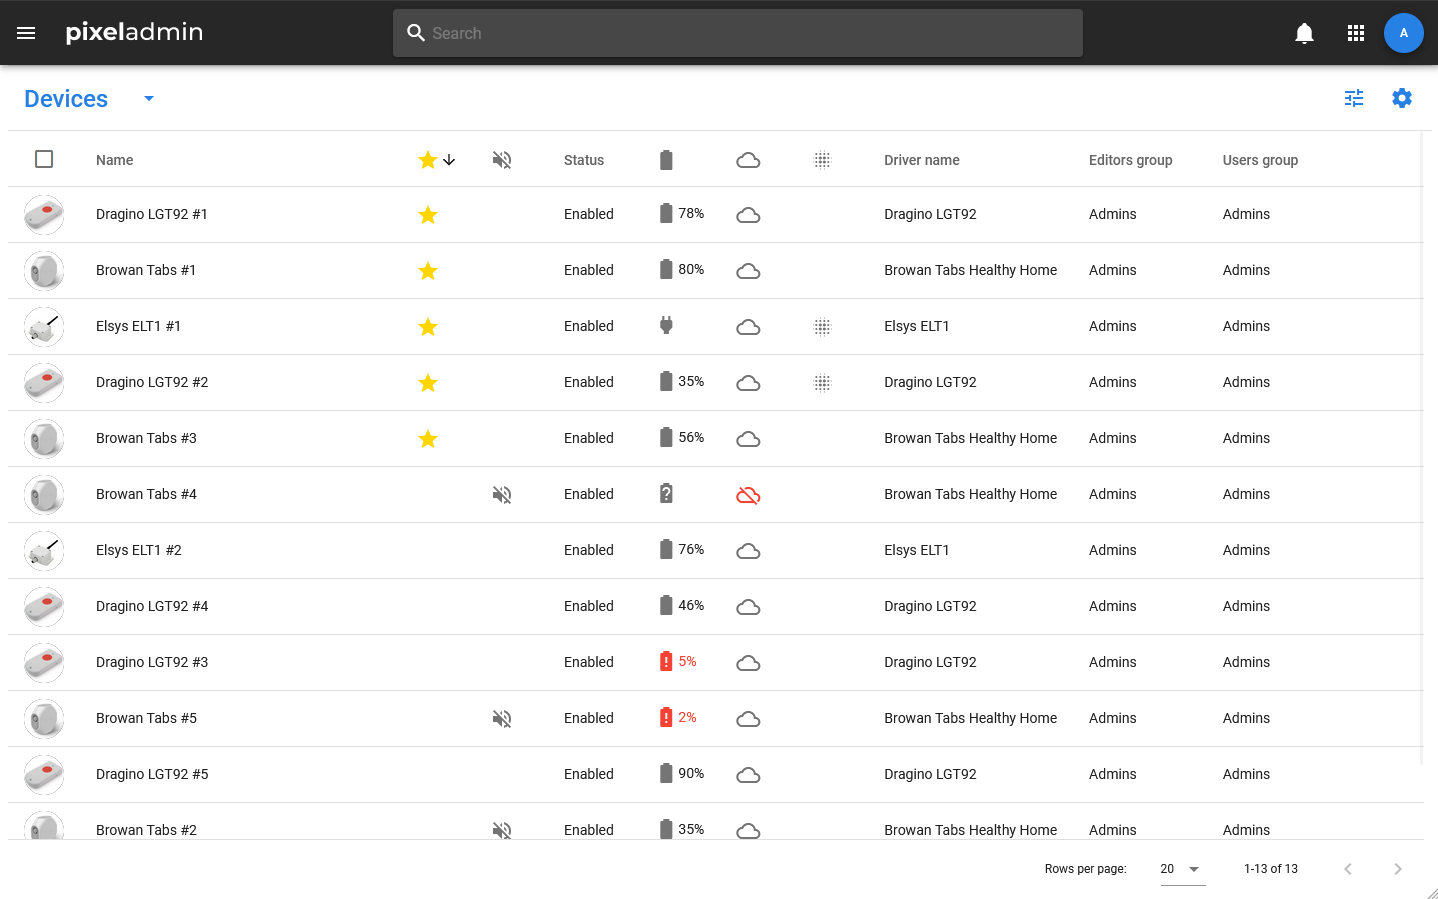
The device table opens when you select the same item in the menu. It displays the following information:
- Name — icon and name of the device. The device icon is set by the driver, and the name can be set and changed by the user. Within the party, device names are not unique.
- Favorites — mark whether the device has been added to favorites.
- Muted — mark whether notifications are disabled from the object.
- Status — the main status of the device. Takes values:
- Enable — the device is active and can receive data from the device.
- Disable — the device is turned off. The device can work in this case, but the data coming from it will not be recorded in the batch, and the data from the batch will be sent to the device.
- Response status — the response status of the device. Takes values:
- Active — the device is enabled and has a connection with the physical device.
- Not response — the device is enabled, but there is no connection with the physical device.
- Battery — information about the type and level of battery. The field takes the following values:
- DC — device is powered from the mains.
- Undefined — the power type of the device is not defined.
- Full battery — the battery charge is more than 75%.
- Half battery — the battery charge is less than 75% and more than 5%.
- Low battery — the battery charge is less than 5%.
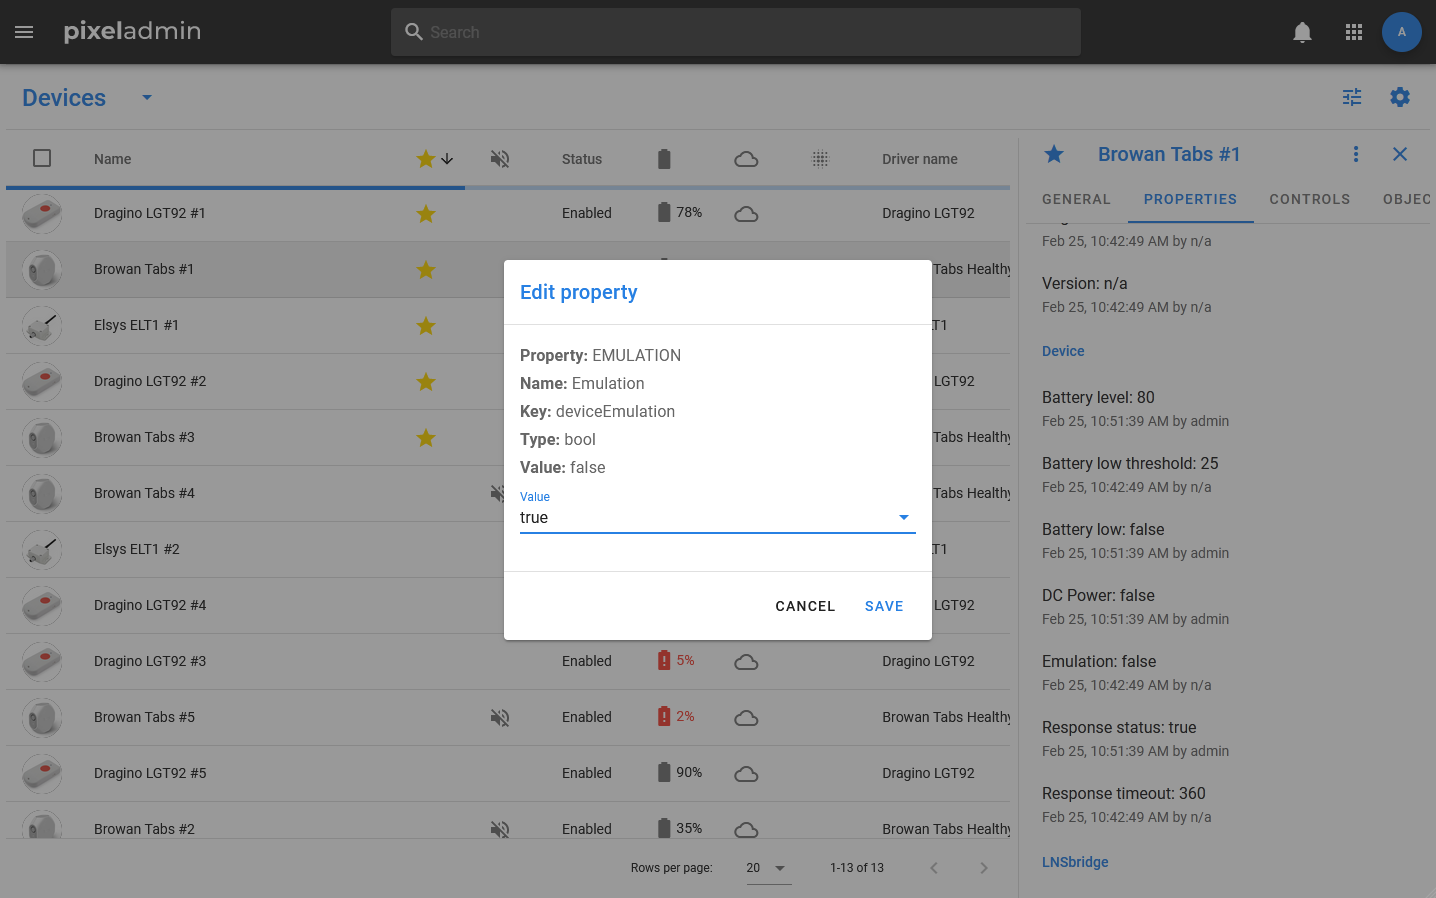
- Emulation — value of the emulation flag.
- Driver name — name of the driver whose data schema was used to create this object.
- Editors group — a group of editors.
- Users group — a group of users.
- Readers group — a group of readers.
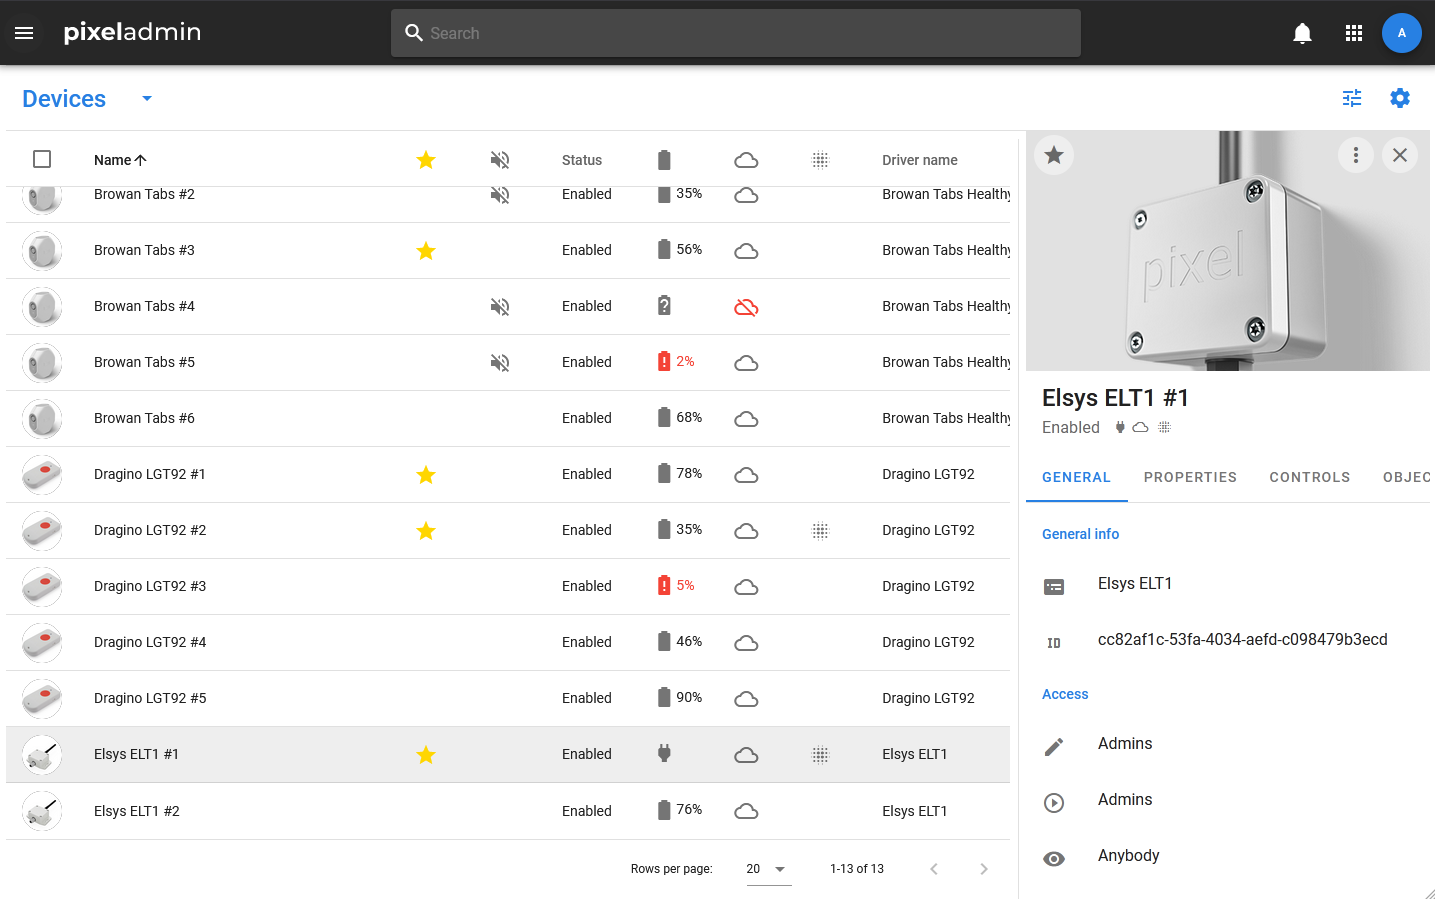
Detailed information about the device is displayed in the card. The status, information about the battery, emulation, and the presence of installed but not applied pending values is included in the subtitle: the status is displayed in text, and icons are used for the rest of the data.
The device card includes the following tabs:
- GENERAL — a tab with basic information about the device. It displays the name of the data schema on the basis of which the device was created, information about access rights, a description of the device and its UUID.
- PROPERTIES — a tab that displays all the properties of the device with their current values.
- CONTROLS — a tab that displays all the methods that can be used to work with the device. Each method has an icon indicating its status (installed, requested, processing, error).
- NOTIFICATIONS — notifications related to this device.
- OBJECTS — a tab with a list of objects (datasets, media, and other devices) associated with this device.
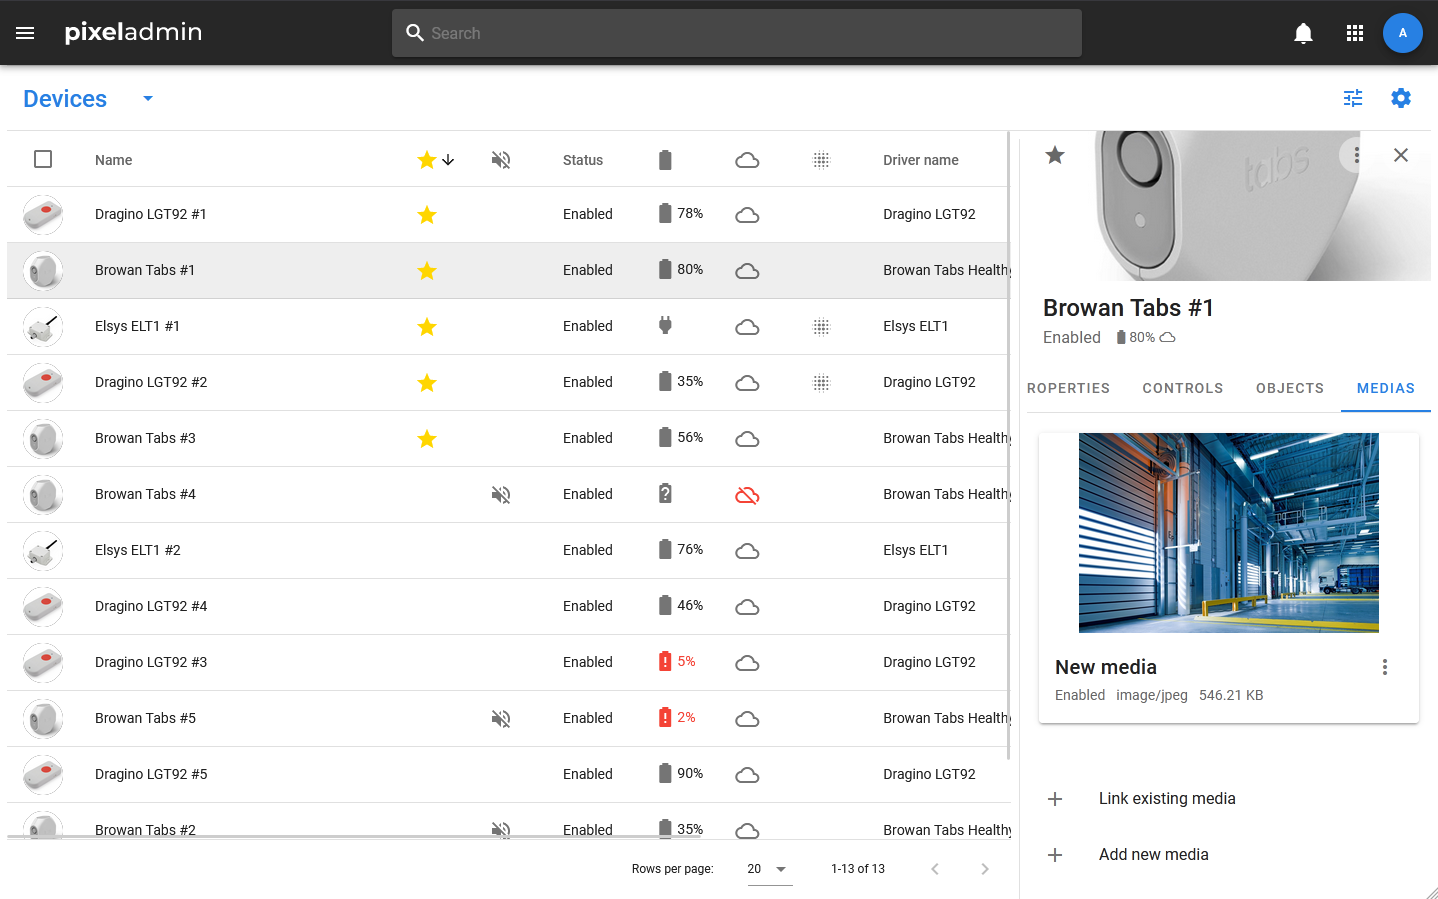
- MEDIAS — a tab that displays a list of media linked to the device.
- FRAGMENTS — a tab for displaying fragment objects. Appears if the object has fragments.
Creating devices
To add a new device, you need:
- Open the device table by selecting the appropriate item in the menu.
- In the header of the table, select Devices > Add new.
- In the window that opens, enter the name of the device, select the data schema on which it should be created, and optionally specify a description.
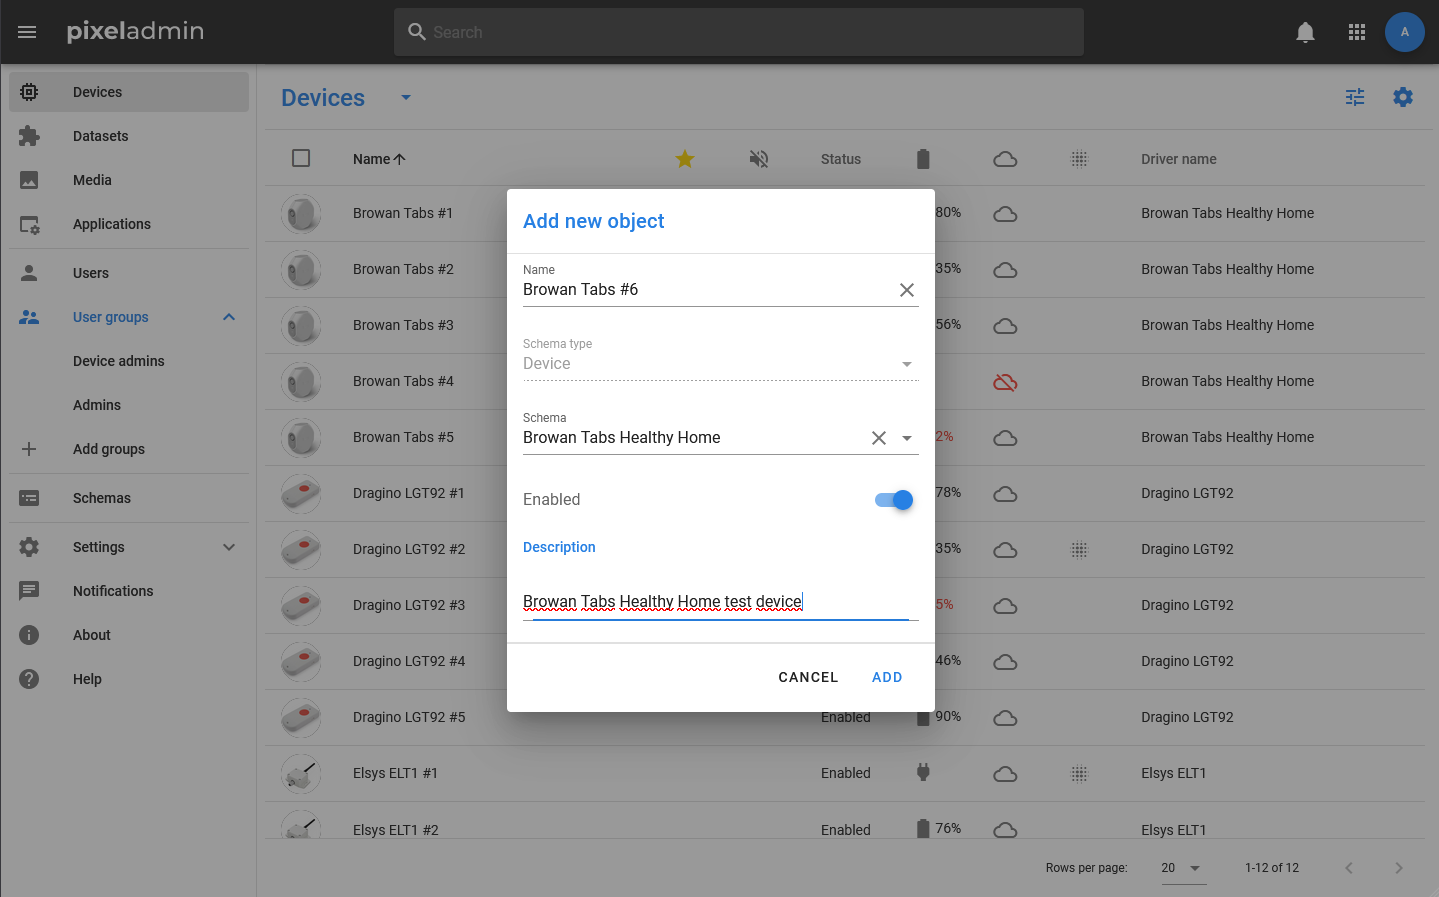
After the device is created, its card will open and you will be able to set the values of individual properties.
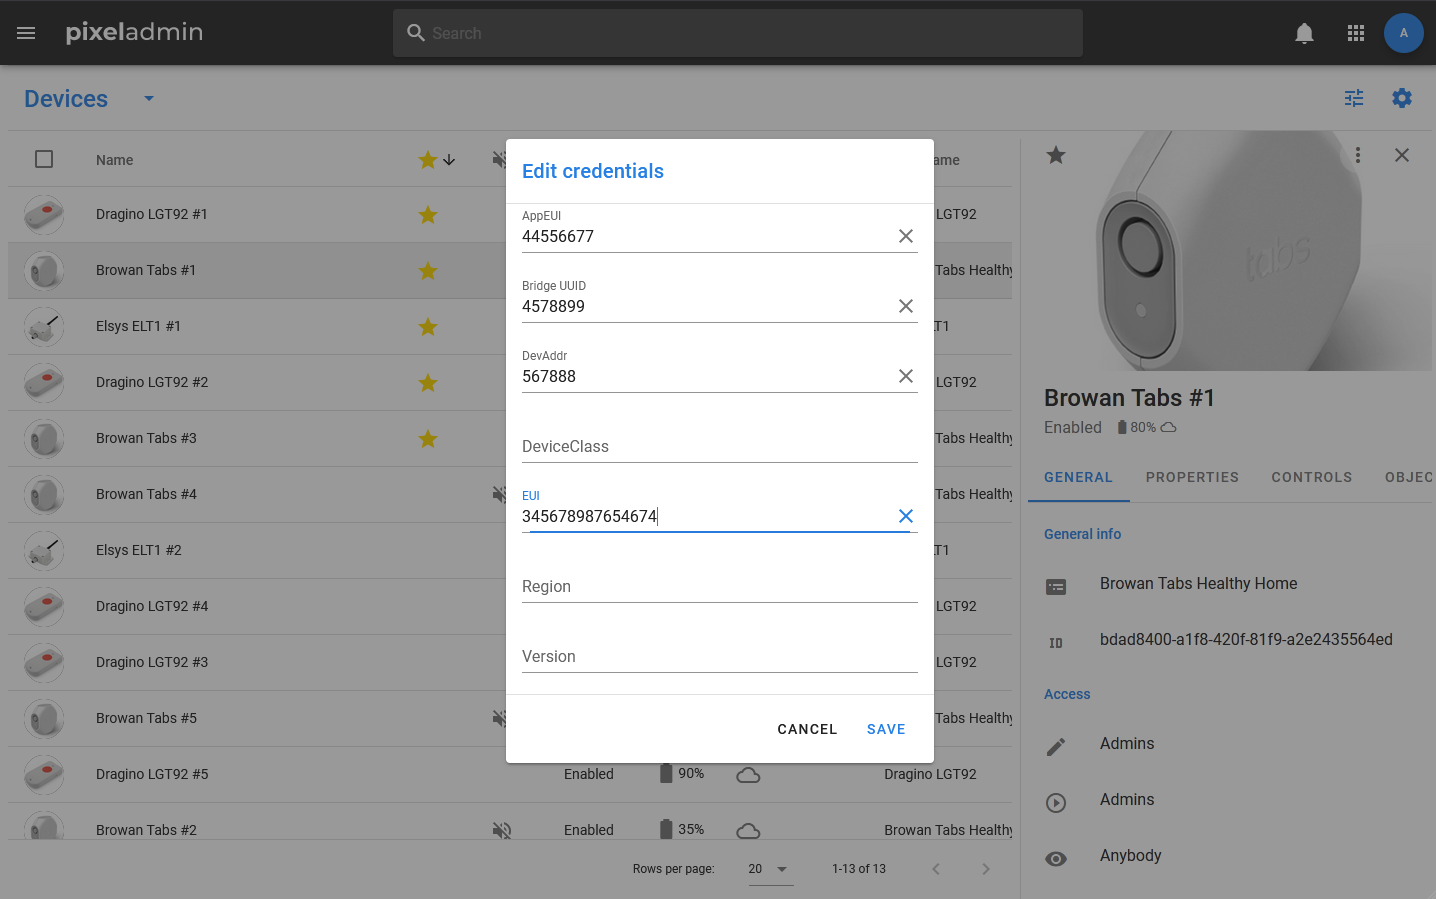
Important
To register a device and establish communication with a real device, as a rule, you need to fill in the properties from the Credentials group. The list of required fields depends on the type and model of the device. It is also important to note that changing Credentials does not lead to automatic registration or re-registration.
Device management
The following actions are available in the context menu of the device card:
- Edit — edit basic information about the device. It includes the name, the Enable / Disable status value, and a description.
- Change access — edit access rights.
- Change schema — changing the data schema. Using this action may lead to data loss and incorrect display of the history of changes!
- Disable / Eenable — change the Disable / Enable status. If the device has the status Disabled, then, regardless of whether the real device is working, it will neither receive nor send any data.
- Create notification — sends a notification associated with this device.
- Mute — disable notifications from the device.
- Show history — view the history of properties. The history can be uploaded in CSV format.
- Show controls history — view the history of controls. The history can be uploaded in CSV format.
- Download notifications — download notifications. In the dialog box that opens, you can select the date range within which notification records should be included in the table. After that, you can download the table in CSV format.
- Copy UUID — copy the device’s UUID.
- Delete — delete.
Properties
Object properties can be changed in groups by calling the corresponding window via the menu, or individually.
To simultaneously edit a group of properties, you need to open the device menu: click on the menu icon in the header of the card and select Edit GroupName (the name of the desired group). After that, in the window that opens, you can change the value of all or individual properties.
The following actions are available for a single property:
- Edit property — changing the value of a property.
- Copy — copies the name and current value of the property to the clipboard.
- Set default — the value of the property changes to the default value stored in the data schema (if any).
- Link — setting up the link. Allows you to select a property of another object, the value of which will be automatically copied to the current property. If a link has been created for a property, the corresponding icon will be displayed next to it.
- Set null — makes the value empty.
- Show history — opens a window for viewing the history of changes to the property.
History
The history stores information about each new property value, the time of the value change and the author of these changes. You can view the history for all the properties of an object (to do this, select Show History in the object menu) and the history of an individual property (select Show history in the menu of the property itself).
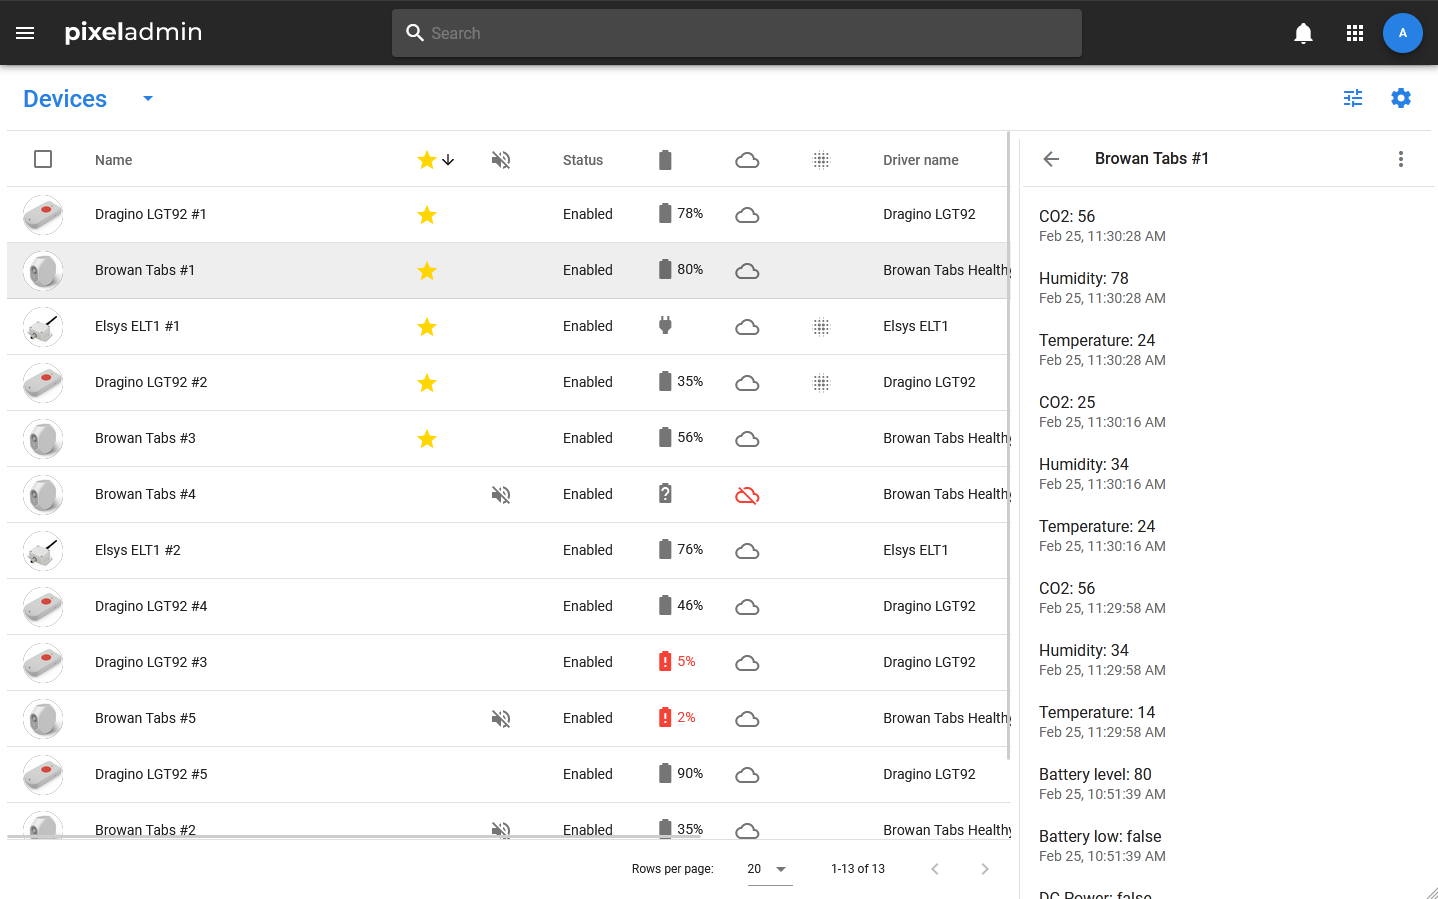
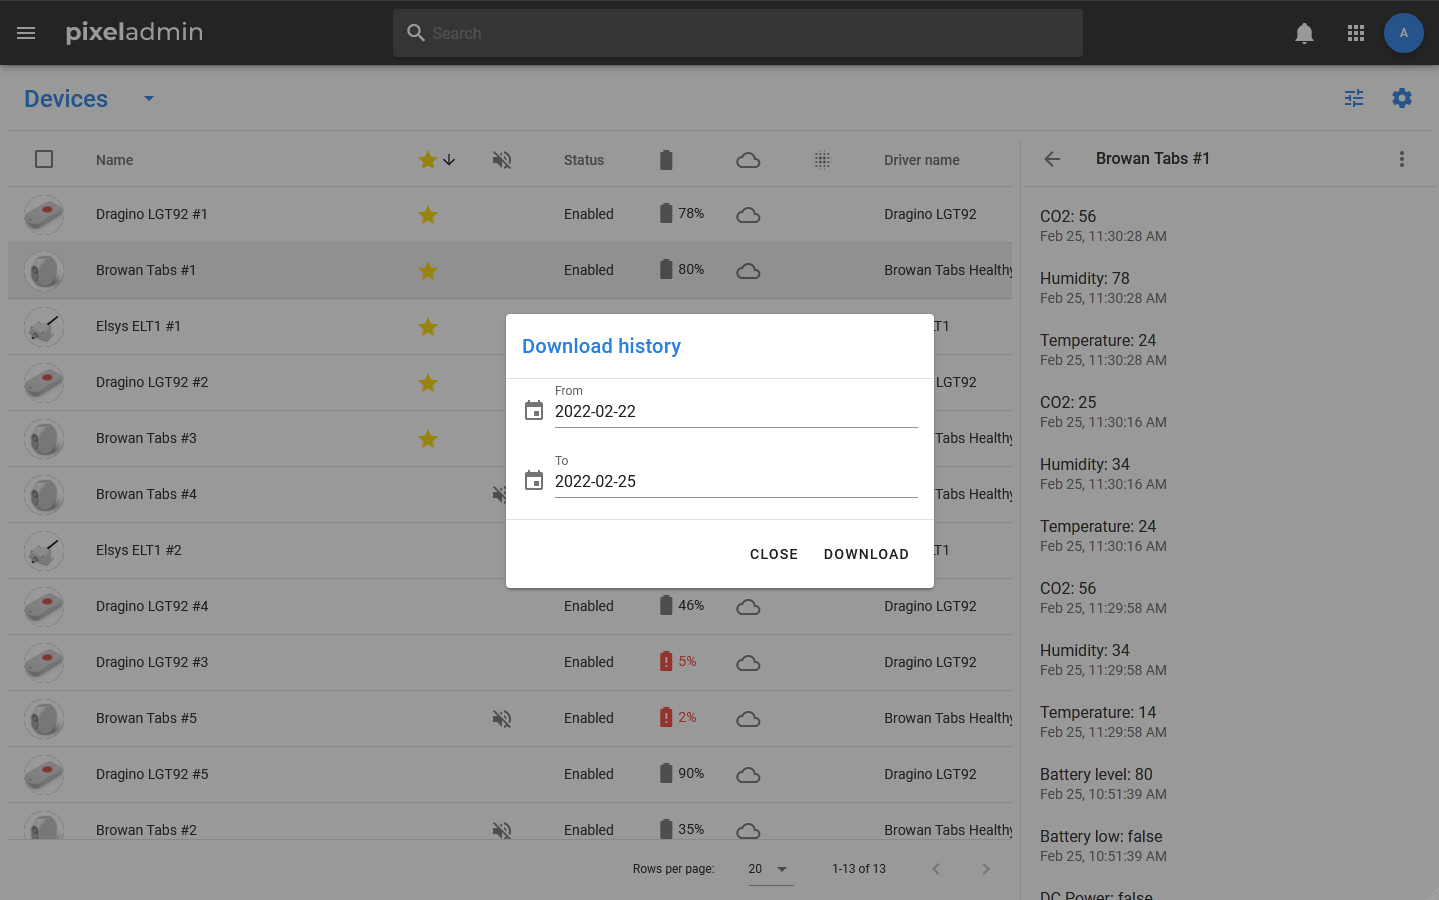
The history is displayed in a special window. In its menu, you can select the period for which the history should be displayed (day, week, month). If you need to get a history for a certain period, you can save it in CSV format.
To do this, you need:
- Open the history window.
- Open the menu by clicking on the three dots in the window header.
- Select Download History.
- In the window that opens, specify the date range.
- Click Download and wait until the download file is generated.
Important
Fields such as object name, main status, and description are not properties, and their changes are not displayed in the history.
Controls
Controls are interfaces for RPC calls. The list of available controls is displayed in the corresponding tab (if there is no such tab in the card, then they are not provided for by the data schema to which the object belongs). The list displays the names of controls and icons corresponding to their execution statuses. If there is no icon, it means that this control has not been called for the object yet. If the icon is red, it means that an error occurred during the execution of the controls.
The following actions are available for each control:
- Execute — execute controls. If the controls are called without parameters, a confirmation window will appear. If it is possible (or necessary) to specify parameters for it, a window opens in which you can enter them and confirm execution.
- Show history — show the history of controls calls.
History
The history of controls can be viewed both for the entire object and for individual controls (by analogy with the history of properties). When you select the Show History menu item, a list opens in which the names of controls are displayed with icons corresponding to their execution statuses (success or error), as well as the time of the call and the initiator’s login.
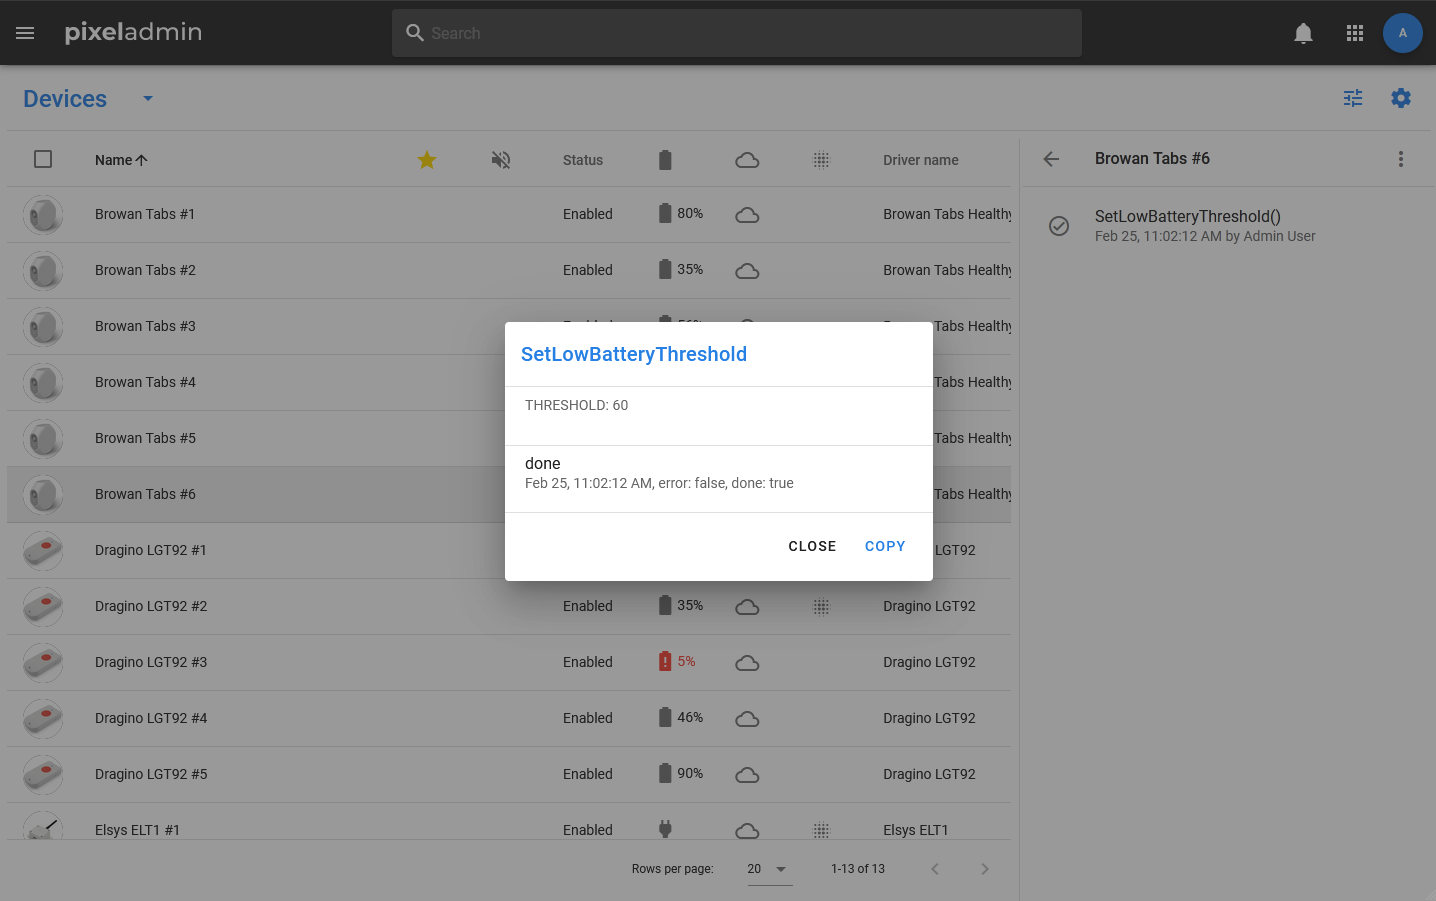
Since the number of parameters for different controls varies and can be very large, their values are not displayed in the list itself. To see with what parameters the controls were called, you need to select the Info item in the menu of a specific call.
In this case, a window opens in which detailed information about the execution of controls is displayed. You can copy it by clicking on the button at the bottom of the window.
Linked objects
Linked objects are objects whose cards can be viewed from the current object. They are not dependent, but can be used for various specific settings (for example, this is used in a Pixel Monitor). An object can contain any number of linked objects and can itself be linked to any number of objects.
Media are also linked objects, but they are placed in a separate tab so that they are displayed not as a list, but as cards with images and information about files.
You can always link both an existing and a new object of any type to an object by using the buttons in the corresponding tabs of the card.
Fragments
Fragments are also objects. But if the linked objects remain independent and no restrictions are imposed on them, fragments, on the contrary, are subordinate. They cannot be removed or disconnected from the main object.
For fragments, actions such as viewing the history of properties and properties and copying the UUID are available.